👀 학습 목표
- 커맨드 패턴을 이해하자.
- 커맨드 패턴을 리모컨에 적용하자.
- 커맨드 패턴 매크로를 만들어보자.
- 커맨드 패턴을 어떤 식으로 활용하는지 알아 보자.
1. 커맨드 패턴이란?
커맨드 패턴을 이용하면
요구 사항을 객체로 캡슐화할 수 있으며, 매개변수를 써서 여러 가지 다른 요구 사항을 집어넣을 수도 있다. + 요청 내역을 큐에 저장하거나 로그로 기록할 수도 있으며, 작업 취소도 지원한다.
-
이는 외부에서 볼 때는 어떤 객체가 리시버 역할을 하는지, 그 리시버가 어떤 일을 하는지 알 필요가 없습니다. 그냥 excute() 메소드만 호출하면 요구 사항이 처리된다는 것만 알 수 있습니다.
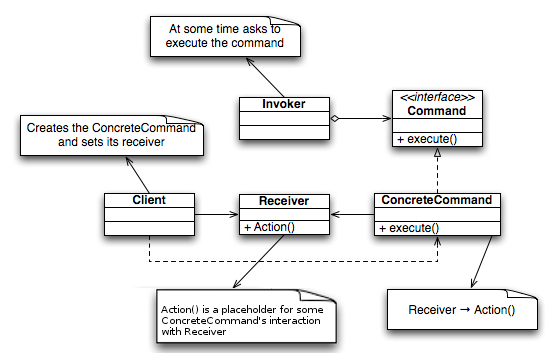
역할 😎
- Client : ConcreteCommand 생성 & Reciver 설정
- Receiver: 요구 사항을 수행하기 위해 어떤 일을 처리해야하는지 알고 있는 객체
- Command: 모든 커맨드 객체에서 구현해야 하는 인터페이스로 모든 명령은 excute() 메소드 호출을 통해 수행되며, 이 메소드에는 리시버에 특정 작업을 처리하는 지시를 전달합니다. undo()메소드는 이전 작업을 취소하는 메소드 입니다.
- ConcreteCommand: 특정 행동과 리시버 사이를 연결해 줍니다.
- Invoker: 커맨드를 세팅하고, execute() 메소드를 호출하여 커맨드에게 특정 작업 수행을 요청합니다.
1. 커맨드 패턴 적용된 식당
예를 들어 커맨드 패턴이 적용된 식당이 존재 한다. 👩🍳
-
아래 순서를 보면 요구하는 객체와 요구를 받아들이고 처리하는 객체가 분리되어 있다.
- 손님이 주문을 한다.
- 웨이트리스는 그 주문을 받아 주문서(order)에 적는다.
- 웨이트리스는 주문서에 주문을 주방장에게 요청한다.(orderUp())
- 주방장은 주문서대로 요리를 한다.
-
이를 커맨드 패턴이라고 생각하면 아래와 같이 매칭 됩니다.
- 손님: 클라이언트
- 웨이터: 인보커
- 주방장: 리시버
- 주문서: 커맨드(캡슐화됨)
- 주문 받기: setCommand()
- 주문 요청하기: excute()
2. 커맨드 패턴 리모컨에 적용하기
여러 가전 기기를 제어하는 리모컨이 있다. 이 리모컨으로 가전 기기를 제어하도록 설계 해보자.
2-1. 기본적인 리모컨
1. Command 인터페이스 만들기
- 이전 예에서는 주문서의 인터페이스라고 할 수 있다.
    public interface Command {

              public void execute();
     }
2. 전등을 켜기 위한 커맨드 클래스 구현( 커맨드)
- Command 인터페이스를 구현한 것으로 실제 주문서의 역할
- 커맨드 객체의 역할은 실제 작동 메소드를 excute()메소드에 캡슐화 하고, 리시버(실제 작업자) 가 누군지 전달 필요
    public class LightOnCommand implements Command {
        Light light ;    // 리시버: 실제 동작을 하는 객체

        public LightOnCommand(Light light){    // 생성자에서 어떤 객체를 제어할지 전달
            this.light = light;
        }

        public void execute(){   // 리시버 객체가 실제 작업을 하도록 하는 메소드
            light.on();
        }
    }
3. 커맨드 객체 사용하기 (인보커)
- 이젠 실제 리모컨을 만듭니다. 이는 커맨드를 실행하는 인보커 클래스입니다. 위 예에서는 웨이터입니다.
    public class SimpleRemoteControl {
        Command slot;

        public SimpleRemoteControl(){}

        public void setCommand(Command command){
            slot = command;
        }

        public void buttonWasPressed(){   // 해당 버튼을 클릭할 경우
            slot.execute();
        }
    }
4. 리모컨을 사용하기(클라이언트)
    public class RemoteControlTest {

        public static void main(String[] args) {
            SimpleRemoteControl remote = new SimpleRemoteControl();  // 리모컨: 인보커
            Light light = new Light();   // 조명: 리시버
            LightOnCommand lighton = new LightOnCommand(light);  // 커맨드 객체 - 리시버를 전달

            remote.setCommand(lighton);       // 커맨드 객체를 인보커에게 전달
            remote.buttonWasPressed();        // 실제 작업 실행 요청

        }
    }
2-2. 여러 기능 리모컨
총 7개의 ON/OFF가 존재하는 리모컨을 만들자
UML 참고

1) 인보커 - 리모컨
- 커맨드를 세팅, 캡슐화된 커맨드 행동을 실행시킴
    // 1. RemoteControl: 인보커 역할로 리모컨에 해당(웨이터) > 커맨드를 세팅, 캡슐화된 커맨드 행동을 실행시킴
    public class RemoteControl {
        Command[] onCommands;
        Command[] offCommands;

        public RemoteControl(){
            onCommands = new Command[7];
            offCommands = new Command[7];

            Command noCommand = new NoCommand();
            for (int i =0; i<7; i++){
                onCommands[i] = noCommand;
                offCommands[i] = noCommand;
            }
        }
        // setCommand : slot 번호와 그 슬롯에 세팅할 커맨드를 전달받음
        public void setCommand(int slot, Command onCommand, Command offCommand){
            onCommands[slot] = onCommand;
            offCommands[slot] = offCommand;
        }

        // onButtonWasPushed, offButtonWasPushed: 실제 커맨드를 실행
        public void onButtonWasPushed(int slot){
            onCommands[slot].execute();
        }

        public void offButtonWasPushed(int slot){
            offCommands[slot].execute();
        }

        // toString: 오바라이드하여 슬롯별 출력
        public String toString() {
            StringBuffer stringBuff = new StringBuffer();
            stringBuff.append("\n------ Remote Control -------\n");
            for (int i = 0; i < onCommands.length; i++) {
                stringBuff.append("[slot " + i + "] " + onCommands[i].getClass().getName()
                        + "    " + offCommands[i].getClass().getName() + "\n");
            }
            return stringBuff.toString();
        }
    }
2) 커맨드 클래스
- Command로 인터페이스를 정의하며, 커맨드들이 implements 한다.
- LightOnCommand, LightOffCommand 커맨드 등이 존재한다.
- 실제 리시버의 행동을 캡슐화 시킨다.
    public interface Command {
        public void execute();
    }

    public class LightOnCommand implements Command {
        Light light ;    // 리시버: 실제 동작을 하는 객체

        public LightOnCommand(Light light){    // 생성자에서 어떤 객체를 제어할지 전달
            this.light = light;
        }

        public void execute(){   // 리시버 객체가 실제 작업을 하도록 하는 메소드
            light.on();
        }
    }


    public class LightOffCommand  {
        Light light;
        public LightOffCommand(Light light){    // 생성자에서 어떤 객체를 제어할지 전달
            this.light = light;
        }

        public void execute(){   // 리시버 객체가 실제 작업을 하도록 하는 메소드
            light.on();
        }
    }
2-3. 작업 취소 기능 추가(undo)
- 마지막에 누른 작업이 취소되는 기능을 만들자.예를 들면, 마지막으로 불을 켰고, undo를 눌렀다면, 불을 끈다. 마지막으로 불을 끄고, undo를 눌렀다면, 불을 켠다.
1) 커맨드 클래스
- Command 인터페이스
- undo 부분의 메소드 추가
    public interface Command {
        public void execute();
        public void undo();
}- LightOnCommand
- undo 부분의 메소드 추가 정의
    public class LightOnCommand implements Command {
        Light light ;                           // 리시버: 실제 동작을 하는 객체

        public LightOnCommand(Light light){    // 생성자에서 어떤 객체를 제어할지 전달
            this.light = light;
        }

        public void execute(){   // 리시버 객체가 실제 작업을 하도록 하는 메소드
            light.on();
        }

        public void undo(){
            light.off();
        }
    }
2) 인보커(=리모컨) 클래스 수정
    public class RemoteControlWithUndo {
        Command[] onCommands;
        Command[] offCommands;    Command undoCommand;    // undo로 인한 마지막으로 사용한 커맨드 캑체 넣기

        public RemoteControlWithUndo(){
            onCommands = new Command[7];
            offCommands = new Command[7];

            Command noCommand = new NoCommand();
            for (int i =0; i<7; i++){
                onCommands[i] = noCommand;
                offCommands[i] = noCommand;
            }
            undoCommand = noCommand; // 처음에는 undo가 작동하면 안됨
        }
        // setCommand : slot 번호와 그 슬롯에 세팅할 커맨드를 전달받음
        public void setCommand(int slot, Command onCommand, Command offCommand){
            onCommands[slot] = onCommand;
            offCommands[slot] = offCommand;
        }

        // onButtonWasPushed, offButtonWasPushed: 실제 커맨드를 실행
        public void onButtonWasPushed(int slot){
            onCommands[slot].execute();
            undoCommand = onCommands[slot];    // 마지막 실행한 커맨드를 저장하기 위해
        }

        public void offButtonWasPushed(int slot){
            offCommands[slot].execute();
            undoCommand = offCommands[slot];
        }

        // undo() 작업을 호출하는 부분
        public void undoButtonWasPushed(){
            undoCommand.undo();
        }

        // toString: 오바라이드하여 슬롯별 출력
        public String toString() {
            StringBuffer stringBuff = new StringBuffer();
            stringBuff.append("\n------ Remote Control -------\n");
            for (int i = 0; i < onCommands.length; i++) {
                stringBuff.append("[slot " + i + "] " + onCommands[i].getClass().getName()
                        + "    " + offCommands[i].getClass().getName() + "\n");
            }
            return stringBuff.toString();
        }
    }
3) 테스트
    public class RemoteLoader {

        public static void main(String[] args) {
            RemoteControlWithUndo remoteControl = new RemoteControlWithUndo();

            Light livingRoomLight = new Light("Living Room");

            LightOnCommand livingRoomLightOn =
                    new LightOnCommand(livingRoomLight);
            LightOffCommand livingRoomLightOff =
                    new LightOffCommand(livingRoomLight);

            remoteControl.setCommand(0, livingRoomLightOn, livingRoomLightOff);

            remoteControl.onButtonWasPushed(0);
            remoteControl.offButtonWasPushed(0);
            System.out.println(remoteControl);
            remoteControl.undoButtonWasPushed();
            remoteControl.offButtonWasPushed(0);
            remoteControl.onButtonWasPushed(0);
            System.out.println(remoteControl);
            remoteControl.undoButtonWasPushed();

        }
    }
2-4. 복잡한 UNDO
선풍기에 미풍, 중풍, 강풍 이 있다. 이를 undo하는 기능을 만들어 보자. 각 한개의 버튼에 미풍, 중풍, 강품 설정을 할 것이다.
1) 리시버 정의
    // CeilingFan: 속도가 존재하는 선풍기 클래스
    public class CeilingFan {
        String location = "";
        int speed;
        public static final int HIGH = 3;
        public static final int MEDIUM = 2;
        public static final int LOW = 1;
        public static final int OFF = 0;

        public CeilingFan(String location) {
            this.location = location;
            speed = OFF;
        }

    		// 선풍기의 속도 설정 메소드
        public void high() {
            // turns the ceiling fan on to high
            speed = HIGH;
            System.out.println(location + " ceiling fan is on high");

        }

        public void medium() {
            // turns the ceiling fan on to medium
            speed = MEDIUM;
            System.out.println(location + " ceiling fan is on medium");
        }

        public void low() {
            // turns the ceiling fan on to low
            speed = LOW;
            System.out.println(location + " ceiling fan is on low");
        }

        public void off() {
            // turns the ceiling fan off
            speed = OFF;
            System.out.println(location + " ceiling fan is off");
        }

        public int getSpeed() {
            return speed;
        }
    }
2) 선풍기 속도 높이는 커맨드 추가
    public class CeilingFanHighCommand implements Command {
        CeilingFan ceilingFan;
        int prevSpeed;

        public CeilingFanHighCommand(CeilingFan ceilingFan){
            this.ceilingFan = ceilingFan;
        }

        public void execute(){
            prevSpeed = ceilingFan.getSpeed();
            ceilingFan.high();
        }

        // 이전 속도로 변경
        public void undo() {
            if (prevSpeed == CeilingFan.HIGH) {
                ceilingFan.high();
            } else if (prevSpeed == CeilingFan.MEDIUM) {
                ceilingFan.medium();
            } else if (prevSpeed == CeilingFan.LOW) {
                ceilingFan.low();
            } else if (prevSpeed == CeilingFan.OFF) {
                ceilingFan.off();
            }
        }
    }
2-5. 매크로 커맨드
버튼 하나로 여러 작업을 하고 싶다. 예를 들면 버튼 한 개만 누르면 전등이 어두워지면서 오디오, TV가 켜지고, DVD 모드로 변경되며, 욕조에 물이 채워진다.
1) 매크로 커맨드 클래스
- 여러 커맨드를 추가 등록 할 수 있도록 리스트로 저장한다.
    public class MacroCommand implements Command {
        Command[] commands;

        public MacroCommand(Command[] commands){
            this.commands = commands;
        }

        public void execute(){
            for(int i = 0; i < commands.length; i++){
                commands[i].execute();
            }
        }
        public void undo() {
            for (int i = commands.length -1; i >= 0; i--) {
                commands[i].undo();
            }
        }
    }
2) 커맨드 사용법
remoteControl.onButtonWasPushed(0); 를 진행할 경우, 모든 것을 다 켜고, remoteControl.offButtonWasPushed(0);를 진행할 경우, 모든 것을 다 끄게 됩니다.
    public class RemoteLoader {

        public static void main(String[] args) {
            RemoteControl remoteControl = new RemoteControl();

            Light light = new Light("Living Room");
            TV tv = new TV("Living Room");
            Stereo stereo = new Stereo("Living Room");
            Hottub hottub = new Hottub();

            LightOnCommand lightOn = new LightOnCommand(light);
            StereoOnCommand stereoOn = new StereoOnCommand(stereo);
            TVOnCommand tvOn = new TVOnCommand(tv);
            HottubOnCommand hottubOn = new HottubOnCommand(hottub);
            LightOffCommand lightOff = new LightOffCommand(light);
            StereoOffCommand stereoOff = new StereoOffCommand(stereo);
            TVOffCommand tvOff = new TVOffCommand(tv);
            HottubOffCommand hottubOff = new HottubOffCommand(hottub);

            Command[] partyOn = { lightOn, stereoOn, tvOn, hottubOn};
            Command[] partyOff = { lightOff, stereoOff, tvOff, hottubOff};

            MacroCommand partyOnMacro = new MacroCommand(partyOn);
            MacroCommand partyOffMacro = new MacroCommand(partyOff);

            remoteControl.setCommand(0, partyOnMacro, partyOffMacro);

            System.out.println(remoteControl);
            System.out.println("--- Pushing Macro On---");
            remoteControl.onButtonWasPushed(0);
            System.out.println("--- Pushing Macro Off---");
            remoteControl.offButtonWasPushed(0);
        }
    }
3. 커맨드 활용성
1. 요청을 큐에 저장하기
- 작업 큐에 커맨드 객체를 추가하고, 큐로부터 하나씩 제거 한면서, 커맨드의 excute() 메소드를 호출한다.
2. 요청을 로그에 기록하기
- 예를 들어 스프레드시트 애플리케이션인 경우, 매번 저장하는 것이 아닌 특정 체크 포인트 이후, 작업한 행동을 저장하고 기록하여 갑자기 컴퓨터가 꺼질 경우, 해당 로그를 봐서 복구하거나 롤백이 가능합니다.
참고
- Head first design patterns